The Ultimate Guide to Bonding Plastic: Tips, Techniques & Best Practices
Plastic is a cornerstone of modern manufacturing due to its versatility, cost-efficiency, and lightweight. Joining these materials requires precision, specialized knowledge and specialized products. Non-porous surfaces, chemical resistance, and thermal properties create unique bonding challenges that standard adhesives fail to overcome.
Plastic bonding fails when manufacturers lack an understanding of material properties, appropriate surface preparation techniques, and compatible adhesive systems. These failures compromise product reliability, increase warranty claims, and damage brand reputation.
In this comprehensive guide, you’ll learn everything you need to successfully bond plastic, including:
- Why Plastic Bonding Challenges Manufacturers
- Proven Steps for Successful Plastic Bonding
- How to Select Optimal Adhesives for Your Application
Why Plastic is Challenging to Bond: 4 Reasons
The term ‘plastics’ represents thousands of formulations, each with unique bonding challenges. Variations in polymer types, along with the presence of additives and fillers, can significantly impact adhesion. Recognizing these material-specific issues is essential for improving product quality and reducing assembly costs.
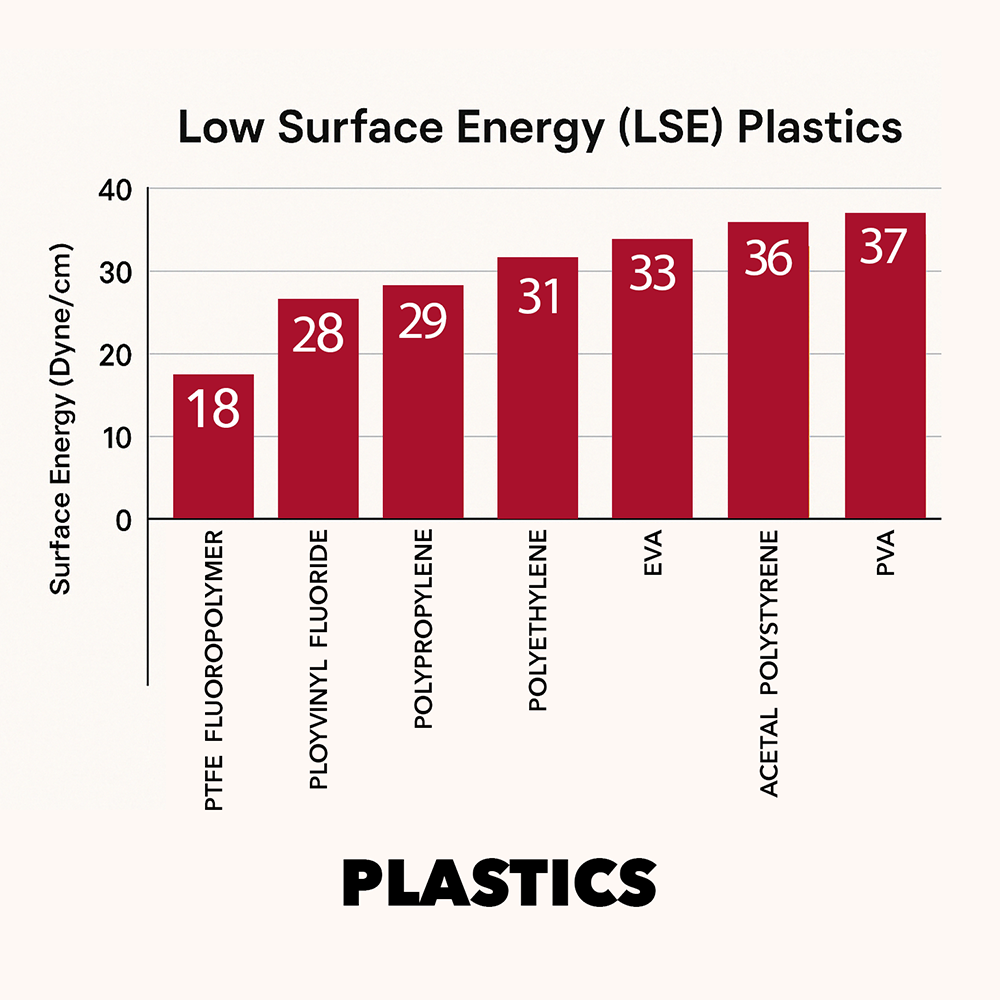
#1. Low Surface Energy (LSE)
Plastics like polyethylene (PE), polypropylene (PP), and fluoropolymers have smooth, non-porous surfaces that inherently resist adhesion, meaning they lack micro-scale irregularities needed for mechanical interlocking. Surface treatments such as plasma, flame treatment, or corona discharge can modify these surfaces at the molecular level, thereby enhancing adhesive bonding.
#2. Chemical Resistance
Materials engineered for high chemical resistance—such as PTFE, PPS, and certain nylons—tend to repel adhesives because their robust molecular structures prevent solvent penetration and chemical bonding. Achieving a successful bond requires selecting adhesives formulated for these challenges and employing targeted surface preparation techniques.
READ MORE: Tips and the Best Adhesives for Nylon Bonding
#3. Thermal Expansion
Plastics expand and contract at rates 3-10x greater than metals when exposed to temperature fluctuations. This fluctuation can stress adhesive bonds, potentially leading to delamination or fractures. Mitigating these issues often involves using flexible adhesives or designing joints that can accommodate the material’s expansion and contraction.
#4. Surface Contaminants
Manufacturing process residues, including mold release agents, oils, and fingerprints, can create unseen barriers that hinder adhesion. To ensure a strong bond, it is crucial to employ specialized cleaning protocols that effectively remove these contaminants beyond what simple visual inspection can detect.
6 Steps for Successful Plastic Bonding
A systematic approach to plastic bonding is essential for ensuring consistent, high-strength bonds across various applications and production environments. Each step in the process addresses specific challenges associated with plastics, from surface preparation to final quality inspection.
Step #1: Surface Preparation
Begin by cleaning the plastic surfaces with solvents that are compatible with the material, such as isopropyl alcohol or specialized cleaners. Avoid using aggressive chemicals that may induce stress cracking or damage the substrate. In many production environments, plasma cleaning is favored because it removes contaminants and activates the surface at the molecular level.
Pyrosil treatment is another effective method for preparing low surface energy plastics. It deposits a thin silica layer that raises surface energy, enabling strong, reliable adhesive bonds. Unlike plasma or corona treatment, Pyrosil creates a durable modification that is particularly effective on polypropylene and polyethylene, providing a longer-lasting surface activation.
For LSE plastics, additional treatments may be necessary to promote adhesion:
- Plasma treatment: Creates polar groups that enhance chemical bonding
- Flame treatment: Oxidizes the surface layer to increase wettability
- Corona discharge: Introduces surface functionality through electrical treatment
- Chemical primers: Deposits a reactive intermediate layer
- Pyrosil treatment: Deposits a thin silica layer to improve bonding on LSE plastics
In some cases, creating a microtexture with fine abrasives (180-320 grit) or techniques like laser etching can improve mechanical interlocking without compromising the part’s integrity.
Step 2: Adhesive Selection and Preparation
Selecting the right adhesive is crucial. The adhesive’s chemistry should complement the specific type of plastic and meet the bond strength, environmental exposure, and regulatory requirements.
Considerations include:
- Surface Energy Compatibility
- Bond Strength Requirements
- Environmental Exposure Conditions
- Processing Constraints
For two-part adhesive systems, ensure mix ratios are maintained accurately using calibrated dispensing equipment. Temperature control during mixing and application is vital, as it affects viscosity, working time, and cure profiles. Adhering to manufacturer guidelines regarding shelf life and storage conditions is also essential for preserving adhesive performance.
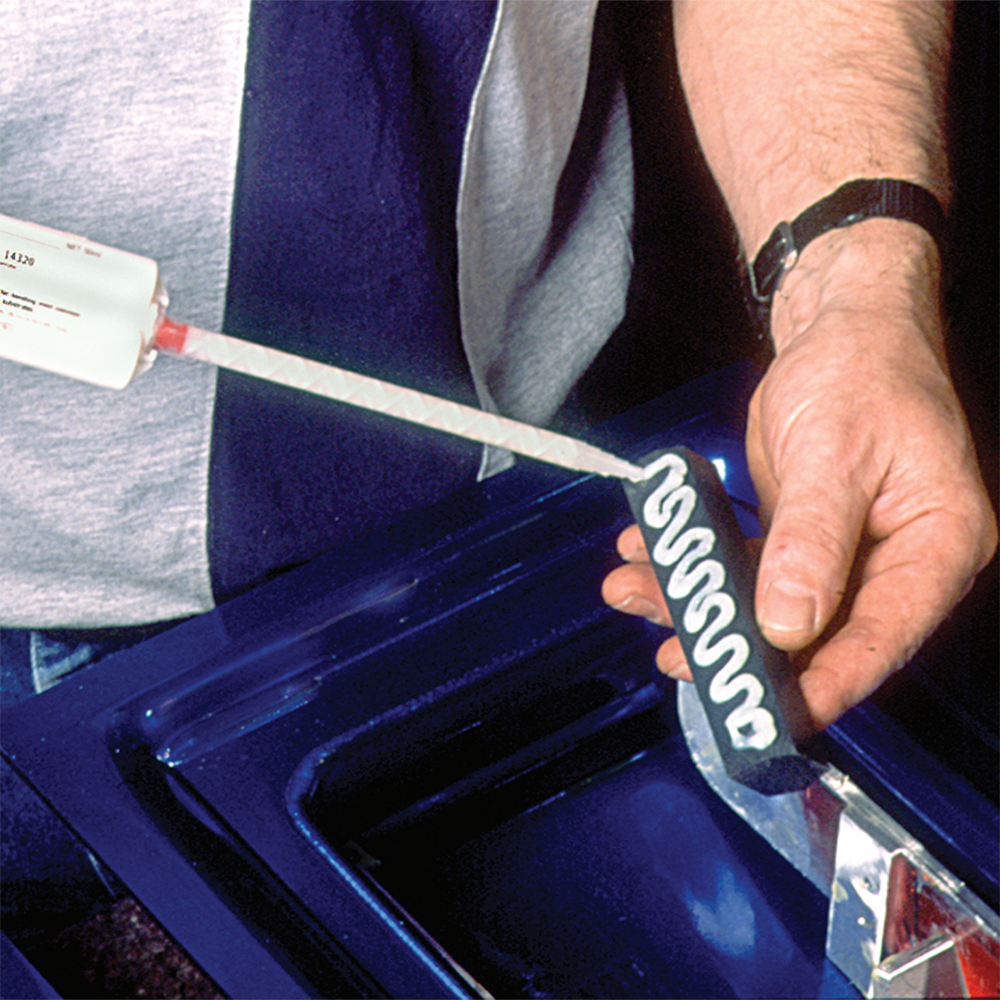
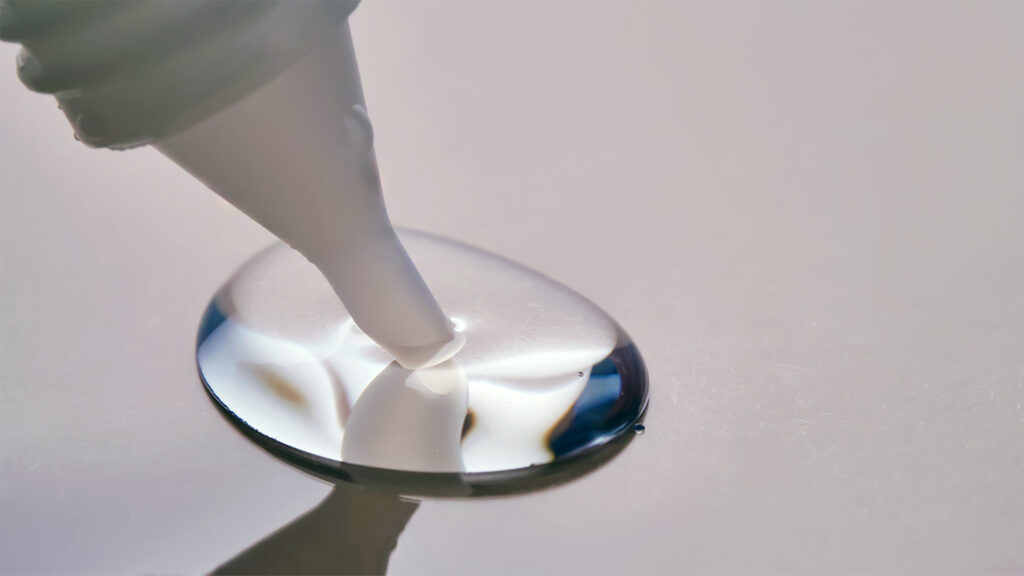
Step 3: Adhesive Application
Accurate adhesive application is key to repeatable bond performance. Use precision dispensing equipment to control the amount applied and ensure bead patterns, dot sizes, or film thickness are all the same.
The design of the adhesive pattern plays a significant role:
- Continuous Beads: Offer environmental sealing.
- Interrupted Patterns: Help manage squeeze-out.
- Controlled Thickness: Accommodates thermal expansion.
- Strategic Reinforcement: Addresses areas of high stress.
Lastly, avoid the use of excess adhesive. Too much adhesive can lead to material waste and create stress concentrations that may trigger failure.
Step 4: Positioning and Clamping
Proper component alignment is critical for forming a strong bond. Use fixturing that consistently positions parts during assembly, and apply uniform pressure with tools such as:
- Mechanical clamps with pressure distribution pads
- Vacuum fixtures for delicate components
- Pneumatic presses with controlled force application
- Weight systems with calculated load distribution
It is important to maintain sufficient pressure until the adhesive develops initial handling strength. Too much pressure can starve the joint of adhesive, while too little may result in voids or weak spots.
Step 5: Curing the Adhesive
Curing conditions must be tailored to the adhesive chemistry and production requirements. Options include:
- Room Temperature Curing: The simplest method but often requires longer cycle times.
- Heat Acceleration: Reduces cure time and increases crosslink density.
- UV Curing: Provides rapid strength build-up for compatible systems.
- Moisture Curing: Controls reaction rates via environmental humidity.
- Activator Systems: Trigger rapid polymerization in specialized adhesives.
It is essential to validate the cure through mechanical testing rather than relying solely on elapsed time. Incomplete curing can leave the adhesive vulnerable to environmental factors and reduce its mechanical properties.
Step 6: Post-Bond Testing and Inspection
Finally, verify the quality of the bond through comprehensive testing and inspection:
- Visual Inspection: Check for proper adhesive coverage, alignment, and absence of voids.
- Destructive Testing: Use on select production samples to assess bond strength.
- Non-Destructive Techniques: Such as ultrasonic inspection for ongoing quality assurance.
- Environmental Testing: Simulate service conditions and use accelerated aging protocols to predict long-term performance.
Integrating process control methods helps identify trends and potential failures early on, while thorough documentation supports continuous improvement initiatives.
Selecting the Right Adhesive for Plastic Bonding
Adhesive selection is crucial—it determines bond durability, processing efficiency, and overall performance. Matching adhesive properties to specific plastic types and end-use requirements is key.
Common Adhesive Types for Plastic Bonding
Epoxy Adhesives
Epoxies form high-strength structural bonds with plastics like ABS, polycarbonate, and nylon. They offer excellent resistance to chemicals, heat, and environmental stressors. Two-component formulations allow for versatile cure profiles and extended working times, which are beneficial for complex assemblies. However, their inherent rigidity can limit their use on thin-walled or flexible components.
Acrylic Adhesives
Structural acrylics are highly effective across many plastics, including challenging substrates such as polypropylene and polyethylene. Methyl methacrylate formulations provide impact resistance and structural performance comparable to epoxies while maintaining flexibility.
Their rapid cure times enable faster production cycles, and some formulations tolerate surface contaminants that might compromise other systems—though they may emit odors and have slightly lower temperature resistance than epoxies.
Cyanoacrylates
Cyanoacrylates, or super glues, offer near-instant bonding, making them ideal for rapid assembly. These single-component adhesives cure through a reaction with surface moisture, eliminating the need for mixing and providing an unlimited pot life until use.
Specialized formulations address specific challenges:
- Surface-insensitive grades for low surface energy plastics
- Toughened versions with improved impact resistance
- Low-bloom formulations for cosmetic applications
- Medical grades for biocompatibility requirements
Despite their speed and convenience, cyanoacrylates tend to be brittle and may not be ideal for applications involving significant flexing or thermal cycling.
Polyurethane Adhesives
Polyurethanes strike a balance between strength and flexibility, making them well-suited for bonding dissimilar materials and components subject to movement or impact. Their excellent elongation properties accommodate thermal expansion while maintaining structural integrity.
These adhesives excel in outdoor environments due to their resistance to moisture and UV exposure, though they typically require longer cure times and extended fixturing. Moisture-cured systems simplify application but demand careful humidity control.
Solvent-Based Adhesives
Solvent cements work by dissolving the surfaces of compatible plastics, allowing polymer chains to intertwine and effectively “weld” the materials together. They create potent bonds between identical plastics (e.g., PVC to PVC, acrylic to acrylic), though their cross-material compatibility is limited.
Proper ventilation is essential during application due to volatile organic compounds (VOCs) and solvent evaporation.
UV-Curing Adhesives
UV-curing adhesives rapidly transition from liquid to solid upon exposure to ultraviolet light, making them ideal for high-speed production lines. They ensure precise positioning with no drift during curing and are particularly effective in applications requiring optical clarity, such as medical devices and displays.
The main limitation is that UV light must reach the bond line, which restricts their use to transparent or translucent materials.
Pyrosil Treatment
When paired with Pyrosil surface treatment, many standard adhesives—such as epoxies, acrylics, or polyurethanes—achieve strong, durable bonds on difficult plastics like polypropylene and polyethylene. By raising surface energy, Pyrosil allows manufacturers to avoid expensive specialty adhesives designed for primerless bonding and instead rely on widely available adhesive systems. This approach combines technical performance with significant cost savings, making it ideal for applications where both reliability and efficiency are critical.
What to Consider When Selecting Your Adhesive
When choosing an adhesive for plastic bonding, consider the following factors:
- Material Compatibility: Ensure the adhesive chemistry aligns with the specific plastic formulation. Testing is essential since manufacturer guidelines may not address all proprietary or modified materials.
- Performance Requirements: Define the necessary mechanical, thermal, electrical, and chemical resistance, including load-bearing capacity, impact resistance, operating temperature range, and exposure conditions.
- Process Integration: Choose adhesives that seamlessly integrate with existing production equipment and workflows. Evaluate cure mechanisms, work life, fixture time, and quality control methods.
- Environmental Considerations: Assess resistance to humidity, temperature cycling, UV exposure, and chemical contact. Geographic location and environmental stressors play a significant role in performance.
- Regulatory Compliance: Ensure adherence to industry-specific standards such as food contact, medical use, potable water, or low VOC requirements. Detailed documentation of adhesive composition and performance certification is often necessary.
Conclusion
While this guide outlines standard steps for bonding plastics, the process is inherently nuanced and may require adjustments tailored to specific materials and conditions. Each application brings unique challenges that demand a deep understanding of both the plastics and the adhesives used.
Partnering with an adhesive specialist, such as Chemical Concepts, ensures you select the right adhesive solution for your unique needs. Their robust offerings and expert guidance can reduce development time, optimize material selection, and prevent costly production failures. With Chemical Concepts, complex bonding challenges transform into reliable, repeatable processes that give your business a competitive edge.
Have questions about plastic bonding? Ready to discuss the solutions for your next project? Contact the expert team at Chemical Concepts for personalized advice and adhesive recommendations.